Prepared Society Forum banner

Seeking Help with Bunker Water Storage

3K views 11 replies 6 participants last post by  oldasrocks  
#1 ·
Good evening, everyone. My name is Doug and I am new to the site, as well as this style of messaging. I am relatively new to the prepper community but recognize the very real advantages preparedness affords and have committed to building a bunker for myself and family in 2016. I got into prepping purely by accident. I ordered a book on fatherhood best practices a few months back and Amazon accidentally shipped me a book called One Second After. They let me keep it because the mix up was theirs and I found it to be very compelling.

I am an army veteran; work as a software project manager; and have a wife of eight years and three children (and counting). We rent in Newcastle, WA now but will make a move east to the Snoqualmie area to settle on a home (at the base of the Cascade Mountain range) with a few acres in the next six months.

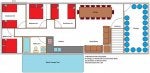
I have a bunker budget of $150k and have had many conversations with a highly regarded concrete contractor who has quoted me $75k (minus excavation) for a 20'x60' reinforced concrete bunker with 8' ceilings, 8" walls, and the roof at 5' below ground (entryway included). I have included as attachments here a footprint and rough schematic of the power, water, ventilation, and drainage infrastructure.

Power - In the event of an EMP/solar storm the wiring and solar panels will be stored in one of the bunker's bedrooms. The physical hookups will be put on my roof right away, oriented in such a way as to maximize sun exposure. When needed, the panels and wiring will be brought out, hooked up, and will feed into the bunker's battery system, feeding the LED lights, water heater, and ventilation fans (NBC filtration system). Does anyone have any guidance on lessons learned or advice on what the "best" solar panel/battery system might be for my needs? No refrigeration or anything substantial. The bunker will not be fed by any power system besides this solar panel and battery setup.

Ventilation - There will be steel ventilation pipes every 10' (so 14 total, standing about 8' tall on the surface, each with holes drilled throughout the sides of the top) along the sides that serve the dual purposes of concealed ventilation inlets and chain link fence posts (probably supplemented by smaller posts in the middle, every 5'). The fence would encircle a garden and fruit trees, and the enclosure would further be surrounded by orchard. These will feed along the ceiling of the bunker into a central pipe that feeds into an NBC filtration system with capacity for up to 17 or so people. As with the power section above, any guidance in this area will be especially appreciated.

Water - I am thinking of burying an adjacent 20,000 gallon fiberglass potable water storage tank, gravity-fed into bunker kitchen and restroom. Roof runoff (hopefully I can get a metal or clay roof) could be fairly easily channeled into a buried receiver pipe that would store the plentiful water we get in the Pacific Northwest. This would be buried just under the service for both ease of accessibility to the top and to take advantage of gravity to feed into the kitchen and restroom. What are your thoughts on this idea and its potential for safe, long-term storage? A water heater would be one of the few draws on the solar panels/batteries, so water would have to go through this system for the kitchen sink and shower. Would anything need to be added to the water to increase its longer term viability? Drainage options also need to be considered. Any advice is most welcome.

Drainage - For grey water I am thinking of a pipe that would ideally (again) gravity feed into vegetation of some sort. And as far as septic, I was (perhaps naively) hoping to avoid that altogether with a very nice compost toilet. I just worry about the maintenance involved with a septic system - am I wrong? I might well be. The thinking is that the composted waste would be recycled above in the garden and orchard. The only requirement would be a vent pipe leading to the surface.

At the end of the day, I just want this to be concealed entirely (entrance under a carpet in a well-locked inconspicuous garden shed). So if anyone walked in my back yard they'd just see a garden with a bunch of fruit trees. And even if SHTF, the only change from normal would be the presence of solar panels atop the roof with a well-hidden/buried cable leading to the shed and the rain gutter pipe feeding into a pipe in the ground. The storage room would of course be stocked with 2,000 or so 50 oz. cans of Ma Collis (Keystone) beef and chicken, with enough rice, lentils, salt, beans, and wheat to feed a small army.

I feel in good company with you all and have to say it is nice to be able to talk about this stuff without getting sideways looks. I just can't stand the thought of my little ones facing the sort of conditions one might expect if the grid goes down even for a month or two.

Thanks for your insight and recommendations on where I should go to procure these items or what I should be considering as I move forward with this investment. I look forward to many years with you all. I will also pose the same questions to the electricity and other chats in this community.

Best,

Doug
 

Attachments

#2 ·
My thoughts on water storage include a well dug through the floor of the bunker and a hand pump. Depending on location and depth of water you might be able to use a 12V well pump also.

I would go with a septic system as I would prefer flush toilets even if I had to hand pump the tank full. Properly installed a septic system can go for years if maintained properly. Even then you need a vent system. Take your vent pipe to the surface then turn it horizontally with a slitted pipe buried under larger rocks. That way it would not be visible to anyone above. or run the pipe through the wall of the garden shed.

You can easily hide the air pipes in the same way. Go through the wall in the garden shed and add a louvered grill to the shed. It will look like the shed has ventilation.
 
#3 ·
A couple important additions.

There is a chemical you can add to the concrete to make it waterproof. That way water will not seep though the pores left from the drying concrete. It also strengthens the concrete X's 2.

Put a hand crank blower on the incoming air vent for emergency use filtered of course.

I have a backup camera on my van. 12V system and the camera is small, easily camod by being in a bird house. Install this as you build so you can see whats going on outside. Regular cameras on the shed would lead to too many questions.

Your fiberglass water tank won't work. If it is not kept full it may collapse from the weight of the dirt on top. The instructions for a fiberglass septic tank tell you to fill the tank before burying for this reason. The same would hold true for a water tank.
 
#4 ·
One Second After will scare the heck out of you.... I agree with oldasrocks... My friend has her pump inside the bunker and it is perfect... I used to have a bunker in WA and I hated it, you feel like you are in a grave... Just make sure you have a contractor who has experience with UNDERGROUNDS!!! I came from a community that has hundreds of bunkers and I have heard just about every horror story there is.... I even know someone who has an underground for her horses!!! Our underground had a 400gal water tank in it fed from the well but if I had to do it over, I would do the well pump inside instead...
 
#5 ·
Welcome to the right place, lots of experience here on all areas of prepping. You haven't mentioned how your property lays out, if you are on the front range of the Cascades, water run off could cause considerable problems for an underground structures, so large slotted drainage pipe embedded in a lot of gravel surrounding your bunker is very important. We have dealt with drainage problems when we first moved here in the coastal mountains of S.W. Oregon and know exactly how important proper drainage is, we had a dirt bank collapse due to saturated soil from a week long rain storm, we also learned about the term angle of repose, the minimum angle at which soil will flow. The saturated mud from that dirt bank was about 2 to 5 degrees and it was moving toward our travel trailer, which we were living in while trying to build our home. I grew up in Washington and I know all about what the end result of heavy rains can do. I'm with oldasrocks on the fiberglass tank, my thinking would be, as long as you're having concrete poured have an attached cistern poured with a manhole cover for clean out access. We built a 1,100 gallon cistern with hand mixed concrete at the top of our property which is fed by a spring further up the mountain behind us, this cistern provides our home with 25 psi water, I love the fact I don't have to pay for electricity to have it pumped. We are also installing a solar backup system, I built a shed for the batteries, solar controller and inverter and I'm going to shield it with screening that is grounded for a Faraday shield. I don't have the solar panels installed yet as I have to build the mounting system, meanwhile they are stored in a shielded area until the solar activity cycle peters out. Do a search here on solar systems, there are a lot of people here that have excellent systems and a ton of experience on setting them up. If you don't find what you want on searching, don't be afraid to ask what you may think is a dumb question.
 
#6 ·
I'm with Viking and oldasrocks on the concrete water tank instead of a fiberglass one. If you don't fill them first, they will float out. I would abut it to the bunker so you can share a wall (save $$$) and have some sort of man access to the water tank from inside the bunker. With a locking manhole cover for the top of the water tank, it could be used as an emergency exit. You do want to use a high quality hydraulic concrete.

I also don't see roof support columns for load bearing which means you'll need huge amounts of rebar in the roof. What I have seen used here in Texas in underground houses is drill stem filled with concrete. Then frame the interior walls around the pipes.

You also have to be aware of hydraulic pressure from saturated soil. You can cheat a bit using a sand-gravel mixture a foot or so wide around the exterior walls to absorb some of the pressure, but some sort of french drain system is a good idea. That water could even be fed into your water tanks as long as there is a way to divert it if the water tank(s) are full.

Footings/Piles- It's best to go down to bedrock with piles, but deep, wide footings are a necessity for a stable structure.

I also suggest talking to a builder who has underground experience in your area as there are differing requirements for differing soil types.

I suggest switching the dining and living areas for ergonomic and defense reasons. You always want to be facing the entrance, and moving the dining area by the kitchen saves steps. You also want the door to your shed on another wall. You'll thank me when you start moving things down there. The entrance on the layout is not compatible with the above ground layout. I suggest rotating the stairs so the come down over one corner of the bunker. That should give you more storage. You'll also want a dogleg at the bottom for defensive reasons.

Oh, and no trees within 20' of the bunker. The roots could end up being a problem otherwise.
 
#7 ·
I'd put bedroom#2 and the bathroom where the dining room is. That would save the wasted space of the hallway and give easier access to the bathroom as you enter the shelter in case you're muddy or contaminated. So what if doorways are visible--its a shelter not a house.
 
#8 ·
I was just thinking about the mention of waterproofing for underground structures and remembered what a guy used on his earth bermed home and that was a cardboard looking material that was made with Bentonite clay, Bentonite clay expands in the presence of water creating a seal from any water getting past it.
 
#9 ·
Bentonite if used wrong, can swell and crack a concrete wall. Again I advise to add the stuff to the concrete mix that makes it waterproof. Do a search for waterproof concrete and read accordingly. Too much info to type in here. It also strengthens the concrete by a factor of 2 or more.
 
#11 ·
This tank!

I have seen a couple articles about building these types of tanks, and just found this one.

http://www.backwoodshome.com/build-a-6500-gallon-concrete-water-tank-for-1500/

Build a 6500-gallon concrete
water tank for $1500
By Dorothy Ainsworth

Dorothy Ainsworth
Issue #101 • September/October, 2006

When I bought 10 dry barren "affordable" acres back in 1981 I got what I paid for: No electricity, no septic system, no well, and no water. What I did get was a long narrow rectangle carpeted with star thistle and poison oak, situated on the southern face of a hill (500'x1320′). Buying bare land was a big gamble, but I wanted my own piece of dirt so badly, I could taste it-if only I had some water to wash it down with. Thanks to the local well driller and good ol' Mother Nature, I got that drink of water. I lucked out and struck it rich with a 50 GPM well at a depth of 150 feet for $3,000.
The finished tank house
The next steps were basic. I procured the appropriate permits, built a pump house around the well casing, set a power pole, wired in an electrical box and meter, and called the inspector.
When all my lifelines were hooked up, I installed a submersible pump from Sears by following the do-it-yourself instructions, and to my amazement, when I turned on the control box, water spewed right up out of the pipe! Now I could get serious about improving the property. I'd start with a water storage tank because I believe "you are only as secure as your water supply."
To take advantage of gravity for water-on-demand, the logical place to put a holding tank was at the top of the hill, with the well at the bottom. I called a backhoe man to dig a 3′ deep trench 1/4-mile long and level a spot at the top end for a 12'x12'x6′ concrete tank (6500-gallon capacity).
The 2hp submerged pump in the well would fill the tank via an 1-1/2″ PVC pipe buried in the trench. When the tank was full, I'd use the same pipe to gravity feed water to supply all my household and irrigation needs. Every 60 feet down the line, I would put a 1″ PVC riser sticking up out of the main pipe and cap it with a non-siphoning valve for irrigation. I would later put in 1″ PVC pipes underground off of that main line as needed to supply my various structures as I built them.

With a holding tank I would have the security of a week's or month's supply of water at a time (depending on the season) if the electricity went off for any reason. A stored supply would also save the pump motor from having to cycle on and off whenever a faucet was turned on. My storage tank would fill up in about 4 hours, then the pump would rest, and the well would replenish itself. It sounded like a good plan, so I got busy hauling gravel. I would need tons of it!
I found a source for cheap crushed gravel (¾ minus, meaning no rocks bigger than 3/4″), but, again you get what you pay for-I had to load it myself. I hauled a yard or two a day in my pickup until I stockpiled enough to build the tank. I had it down to a science: Each load took 300 shovels full. When the tires were flattened "just so," I knew that that amount of too much was just enough. I'd creep home, front end floating, turn into my driveway, and step on it full throttle to get a run at the hill, fishtailing all the way to the top. (I had no roads yet.) Poor old "Bessie," my 1971 1/2-ton Ford pickup, has endured cruel and unusual punishment for 20 years, hauling a hundred 1-ton loads of gravel for roads and 780 logs for houses, but she's still going strong.
It took two weeks of shoveling rock to have enough for the job, but loading and unloading the truck 20 times was just the half of it! Each of those 6,000 shovels full of gravel would have to be lifted again-either thrown on the ground to level the pad, or heaved into a cement mixer with sand and cement and water, then dumped and tamped into forms. I looked forward to the day when the "cruel gruel" would be entombed forever.
Bill tamping the first wall pour

I had no electricity on top of the hill, so I borrowed a cement mixer and a gas-powered generator from a neighbor. He was a Bill-of-all-trades who also did everything the hard way to save money. I paid him what I could to help me with the general layout of the tank site, which consisted of setting up batter boards and making sure everything was plumb, level, and square. I covered the large pad where the tank would sit with about 8″ of gravel. Then we built the forms out of 2″x8″ lumber, set the 2″ PVC drain pipe in place, and poured the 8″ thick floor in two grueling days (32 mixers full = 4 cubic yards). We used a garden rake and a shovel to evenly distribute the mix around and work it into every corner. Together we dragged a 2"x6" on edge across the surface of the wet concrete floor using the tops of the forms as guides-a procedure called "screeding." Bill advised me to use no rebar in the slab because it would be filled with water inside and sitting on wet ground outside, and the rebar would eventually rust, leaving voids that would weaken the concrete. Right or wrong, I had no experience to question him, so that's how we did it.
Before the floor set up as hard as a rock, we roughed up the sides of the slab and a 2″ wide strip around the top perimeter to serve as a keyway (an overhanging lip) to help tie the vertical walls to the floor. We used 5/8″ plywood nailed to 2″x4″ frames for the 8″ thick walls. I sprayed the sheets of plywood with petroleum oil (using a garden sprayer) so they wouldn't stick to the concrete when it was time for removing and repositioning them.
Keyway to tie walls to floor
We secured vertical rebar at 2′ intervals inside the wall cavities. Bill helped me with the floor, but then he had to go to another job, so I carried on solo. A cubic yard and a half of concrete was all I was physically capable of shoveling, pouring, distributing, and tamping in 12 hours. I let each daily pour set up, then moved the forms up and raised the cement mixer platform and piles of ingredients to the new level. Bill stopped by on his way home from work each day to help me lift the heavy stuff.
A series of separate pours meant "cold joints"-the lines of demarcation between pours. If the preceding surface is roughed up while the concrete is still "green," the next layer bonds just fine. It's not as ideal as a monolithic pour, but it was the only doable method for me.

The Recipe

There are three basic mixtures that are commonly used for concrete construction, from strongest to strong enough. They differ in the ratio of the three basic ingredients: Cement, sand, and stone. How they are proportioned makes a huge difference in strength and durability. The more cement used, the stronger (richer) the mix, with 1:2:4 being a happy medium for most projects. The less water you can use in relation to the dry ingredients and still maintain a workable consistency, the stronger the mix. A runny mix is weak.
Set up for the first wall pour

Rough on the outside, but Thorosealed and smooth on the inside

Troweling on the Thoroseal
The consistency of fresh mixed concrete should feel like oatmeal cookie batter-but don't lick your fingers. The trick is to not touch the mix at all with bare hands, but for a novice, that's easier said than done because it's tempting to catch the drips and smear them around.
Because Portland cement has abrasive silica and caustic lime in it, I ended up with no fingerprints at all until the "tread" grew back. It would have been a good time to take up a life of crime, but I stayed on the straight and narrow-and plumb.
When you make a batch of concrete, the sum total of the ingredients mixed together will result in a much smaller volume than the separate components-kind of like what happens to that mountain of flour when you make a loaf of bread, or when you can't believe you just used a 1/2-gallon of ice cream to make only two decent-sized milkshakes.
Bill advised me to use a 1:3:5 mix: 1 heaping shovel of cement to 3 of sand, and 5 of gravel. For me, that mixture would be economical for my budget and yet strong enough for my particular application: a heavy foundation and thick retaining walls. Because the tank would be sitting on impenetrable hard rock, I knew it would have to be back-filled to bury it partially underground, which would also help equalize the pressure on the walls. (Water weight pushes out; wall of dirt pushes in.) Backfilling would also keep the water cool in the summer.
Calculating what you need

Using some simple math, I estimated the walls would take 8 cubic yards. Here's how: Multiply length (12′) x height (6′) x thickness (¾ of a foot = .75) x 4 walls and divide by 27 because there are 27 cubic feet in one cubic yard.
The walls

The growling gyrating cement mixer held 1/8 cubic yard (approximately 3.5 cubic feet) at a time, gobbling up 2 shovels of cement, 6 shovels of sand, 10 shovels of gravel. I worked as fast as I could slinging them in, counting and alternating the ingredients very carefully, while constantly adding the water with a measuring bucket (about 4 gallons).
Roofing the tank with shingles

When the batter was "just right," I shut off the motor, swung the cement mixer around on its axis and dumped the load into the forms, then tamped, tamped, and tamped with the business end of a short shovel. I also tapped the sides of the forms with a hammer to vibrate the concrete into every nook and cranny. On the fifth and final pour, I set a pipe through the wall near the top to make an overflow hole. I would later run a 1-1/2″ poly-pipe through that hole and out to my pond.
Each daily pour amounted to 12 mixers full, which totaled 24 shovels of cement, 72 shovels of sand, 120 shovels of gravel, and 48 gallons of water. I guzzled another 10 gallons of water and dumped even more on my head. It took five days of working from daybreak to backbreak to complete the walls. The whole project had to be a marathon because concrete sets up fast in extreme heat, and time was running out on my week vacation from waitressing.
Needless to say, I put my fitness center membership on hold for a while. Sixteen Tons by Tennessee Ernie Ford was my theme song for the week, although the tank ended up weighing 24 tons. Blistered hands on Monday had turned into lobster claws by Friday.

On top of the last pour, I dragged a short 2"x6" on edge across the 8″ wide wet surfaces to smooth them out. I then set four 2″x4″ pressure-treated sill plates in the concrete and leveled them with a long level by tamping and wiggling them into place around the outside perimeter, making sure the corners were squared.
They would be an integral part of the roof construction, providing a wood surface to build a short stem wall on. The "pony wall" would be screened for cross-ventilation, rather than covered with plywood. I built a gabled roof on the tank, with the rafter tails secured to the top plate of the stem wall. (See photos)
When the job was done (floor AND walls), I had used approximately 55 sacks of Portland cement, 6 cubic yards of sand, 10 cubic yards of gravel, and about 400 gallons of water. Not exactly like building Hoover Dam, but it felt like it.
I kept the concrete slab and walls wet while they were curing by spraying everything down with a hose, including myself, as often as possible. I had a hose hooked up to the inlet/outlet pipe in the floor of the tank so water was handy.
Note: This mandatory procedure should go on for at least a week when working in hot weather.

I think the reason my tank has held up so well for 23 years now, in spite of the 1:3:5 "poorman's mix" I used, is because I coated the inside of the tank with a cohesive sealer called "Thoroseal."
One little access door to the inside of the tank

Thoroseal is a Portland-cement-based coating that, when mixed with a milky-looking catalyst called Acryl 60, fills and seals voids and waterproofs the concrete. It prevents any water seepage from leaking into fissures where it might freeze and expand and crack the concrete. It also resists hydrostatic pressure (as inside a water tank) and is non-toxic in potable water tanks. It can be brushed on, but Bill advised me to trowel it on about 1/4″ thick for an impenetrable bond. It took a lot of elbow grease applying it in smooth swipes on the entire inside surface of the tank, but it covered up all those rough cold-joint seams and made it look as smooth and beautiful as a baby-elephant's butt.
I don't claim to be an expert on the subject of concrete tank building. We built the tank during possibly the hottest July in history, so my memory of the details may be a little off due to sunstroke. All I know is that I built it under Bill's tutelage, and it has stood the test of time.
When I look up the hill and see the water-level flag sticking up out of the tank's roof and dancing in the breeze, it helps to quench my thirst for security and self-sufficiency.
Back in the summer of 1983, the finished tank with its shingled roof cost me a total of $750 to build, including the lumber and plywood used for the forms.
Today's average prices

Ingredients to make the concrete:
80 lb. bag of Portland cement = $2.50
Cubic yard of "construction sand" = $15
Cubic yard of crushed gravel (Âľ minus or pea gravel) = $10.
Note: You can buy construction-grade sand and gravel already mixed in the ratio you want at any large rental equipment yard or your local sand and gravel supplier for about $32/yd. or $350 for a 10-yard dump truck full, delivered to your site. That sure beats the way I did it. Having the raw ingredients delivered would have been heaven instead of "the other place!"
Framing and roofing lumber:
2x8s = .70/ft.
2x6s = .50/ft.
2x4s = .35/ft.
5/8″ CDX plywood for roof = $18/sheet
Roof: I recommend composition roofing (cheap) or metal roofing (fireproof). I used cedar shingles back then, but now I would choose metal roofing and also divert the annual rainfall via rain gutters into the tank to supplement the supply.
Total materials it takes for a 6500-gallon tank:
The odd couple
The odd couple
55 bags cement = $140
5 yds. sand = $75
10 yds. gravel = $100
2 yds. gravel under pad = $20
Forms: (40) 2Ă—4 x12s = $168
(8) 2x8x12s = $67
(12) sheets of 5/8″ plywood = $216
Stem-wall: (12) 2x4x12s = $50
Roof: (20) 2x6x8s = $112
(12) sheets of 5/8″ plywood = $0 ( I recycled the same plywood I used for the forms)
Assorted screws and nails and drain hardware: About $50
Thoroseal: (10) 50-lb. bags to cover 500 sq. ft.= $250
Acryl 60: 5 gallons = $125
Composition roofing to cover the 200-sq. ft. roof = about $50
Labor cost = your energy (a renewable resource)
Strong back = fringe benefit
Optional cost of labor if you treat yourself to pizza and beer to celebrate when the job is done = $20
Conservation tips
When you live on well water and have to pump every drop, here are some astonishing figures to consider:
A running faucet uses 3-5 gallons a minute.
A running faucet while you brush your teeth can use 5 gallons.
A running faucet while you do dishes can use 30 gallons.
Washers use 30-60 gallons for each cycle. Wait till you have a full load of clothes before doing the laundry.
A long shower can use 50 gallons. You'll know it was too long when you run out of hot water. You'll know it was way too long when you run out of cold water.
The same tank today adds up to $1,500; still not bad for a permanent 6500-gallon water tank. I say "permanent," but now I have my doubts after overhearing an old timer at the hardware story drawling to another old timer: "There are two kinds of concrete-concrete that's cracked, and concrete that's gonna crack." Then they cackled and wheezed.
Closing thoughts

Any able-bodied person can mix and pour concrete. Building the forms to contain and shape it is the easiest and most elementary carpentry going. So, even though my cave-woman ordeal with concrete might sound difficult, don't be intimidated by the "stuff." It's malleable and infallible. My style is to overbuild everything; it needn't be yours. If you have a little extra cash and aren't in a big hurry, working creatively with small batches of concrete mixed in a wheelbarrow can be downright fun!
Editor's Note: You might be interested in a companion article that Dorothy wrote for our November/December 2004 Issue #90. Entitled, "Water pumping windmills," Dorothy includes an historical background of windmills, explains how they work, their uses, windmill installation and maintenance, and more. Issue #90 is sold out, but you can view the article online. Photocopies of the 8-page article are available from BHM for $4.
Learn more about Dorothy and/or contact her at her website www.dorothyainsworth.com
 

Attachments